Wednesday 29 October 2008

Setup Repositories Linux Mint in Local using DEB UBUNTU

Here I Would like to update Linux Mint using DEB File Using Ubuntu DEB
We Need such as Tea, MP3, POP Mie :-)

Step by Step
============
1. Copy All DVD DEB Ubuntu in Local Linux Mint
Folder Disks and Pool, and Create Folder for Disk 1 = 1 , Disk 2 = 2
Example : ///media/disk/REPO_UBUNTU/1
///media/disk/REPO_UBUNTU/2 ---- till all DVD Ubuntu
2. Type $ CHMOD -R 777 * ---> For All Folder We Have Done Copy
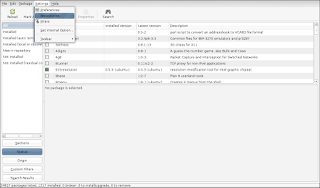
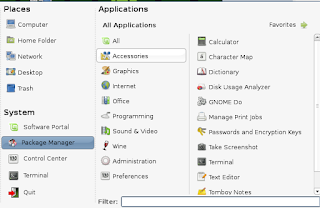
3. Click Package Manager


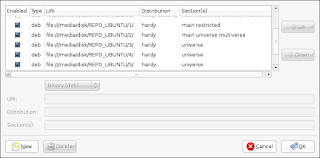
2. Click Setting ---> Repositories


3. Type Setting Repositories


note :
also you can add in /etc/apt/sources.list

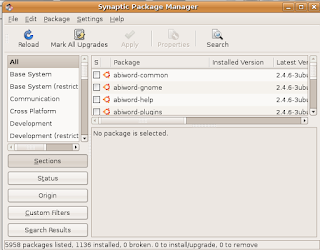
4. Click RELOAD for Ensure your Setting is Correct

5. Now You Add Software as you want

Tuesday 28 October 2008

muCommander in LINUX

I Found Software Easy to Copy, Move coz We Often use High it :-)

1. Download in http://www.mucommander.com/download/

2. Click File


Finally After Go Around in Uncle Google

3. Result of Unzip File


4. For Running Click MuCommaner.sh


Now I Can Work More Easy :-)

Monday 27 October 2008

Command Networking in Linux (page1)

If We Want To Learn and Study Networking Method, better we go to UNIX or Linux 1st
All the big, userfriendly Linux distributions come with various graphical tools, allowing for easy setup of the
computer in a local network, for connecting it to an Internet Service Provider or for wireless access. These
tools can be started up from the command line or from a menu:

--> Ubuntu configuration is done selecting System->Administration->Networking.
--> RedHat Linux comes with redhat-config-network, which has both a graphical and a text mode
interface.

--> Suse's YAST or YAST2 is an all-in-one configuration tool.
--> Mandrake/Mandriva comes with a Network and Internet Configuration Wizard, which is preferably

started up from Mandrake's Control Center.
· On Gnome systems: gnome-network-preferences.
· On KDE systems: knetworkconf.
Your system documentation provides plenty of advice and information about availability and use of tools

Here is Networking Table Command, if any Missing please update me :-)


Reference
Introduction to Linux (Machtelt Garrels)

Friday 24 October 2008

sources.list ---> MINT vs UBUNTU

Change your APT sources
========================

Edit the sources.list as root (sudo gedit /etc/apt/sources.list) to make it look like this:

## -----------------------
## LINUX MINT REPOSITORIES
## -----------------------

## +++ Linux Mint 5 Elyssa (stable) +++
deb http://packages.linuxmint.com elyssa main upstream import

## +++ Backports (not as stable) +++
## deb http://packages.linuxmint.com elyssa backport

## +++ Community (not as stable) +++
## deb http://packages.linuxmint.com elyssa community

## +++ Romeo (unstable) +++
## deb http://packages.linuxmint.com elyssa romeo

## +++ Source Repositories +++
## deb-src http://packages.linuxmint.com elyssa main upstream import
## deb-src http://packages.linuxmint.com elyssa community
## deb-src http://packages.linuxmint.com elyssa backport
## deb-src http://packages.linuxmint.com elyssa romeo

## -------------------
## UBUNTU REPOSITORIES
## -------------------

## +++ Ubuntu 8.04 Hardy (stable) +++
deb http://archive.ubuntu.com/ubuntu hardy main restricted universe multiverse
deb http://archive.ubuntu.com/ubuntu hardy-updates main restricted universe multiverse
deb http://security.ubuntu.com/ubuntu hardy-security main restricted universe multiverse

## +++ Backports & Proposed (not as stable) +++
## deb http://archive.ubuntu.com/ubuntu hardy-backports main restricted universe multiverse
## deb http://archive.ubuntu.com/ubuntu hardy-proposed main restricted universe multiverse

## +++ Source Repositories +++
## deb-src http://archive.ubuntu.com/ubuntu hardy main restricted universe multiverse
## deb-src http://archive.ubuntu.com/ubuntu hardy-updates main restricted universe multiverse
## deb-src http://security.ubuntu.com/ubuntu hardy-security main restricted universe multiverse
## deb-src http://archive.ubuntu.com/ubuntu hardy-backports main restricted universe multiverse
## deb-src http://archive.ubuntu.com/ubuntu hardy-proposed main restricted universe multiverse

## ------------------
## OTHER REPOSITORIES
## ------------------

## +++ Canonical (stable) +++
deb http://archive.canonical.com/ubuntu hardy partner

## +++ Medibuntu (stable) +++
deb http://packages.medibuntu.org/ hardy free non-free


reference
http://www.linuxmint.com

Wednesday 22 October 2008

Driver Windows Wireless using in OS LINUX

Before go to sleep, I try using CD LIVE Mint 5, coz in here I can Play 3D condition my PC.

I would like to try Access Wi-FI
I Have Found Something
The OS Linux Mint Can Update Wi-Fi Driver using Windows Driver
Step by Step
===============
1. >> Adminstartor ---> Windows Network Driver


2. Click " INSTALL WINDOWS DRIVER"


3. Click Active Button Wireless Network


enjoy your Wi-Fi

Freedom for Elegant (Motto of Mint)

Tuesday 21 October 2008

How Make Mounting Windows Partitions in Ubuntu

To Ensure Our Mounting Windows Working, here is step by step procedure

1. Unmount the partition
2. Examine the partition table
3. Create a mount point
4. Edit the /etc/fstab file
5. FAT 32 (instead of NT FS)
6. Save changes
7. Enable read/write for NT FS


1. Unmount the partition
============================

If you already have your Windows partitions mounted (but with the wrong permissions),
unmount them before beginning these instructions. For example, if your Windows partit ion is
mounted as /media/hda1, then open up a terminal and type

sudo umount /media/hda1

2. Examine the partition table
==============================
The first thing we need to do is figure out where the Windows partitions are in the partition
table. Typing

sudo fdisk -l

will tell you the location and the filesystem type (FAT 32 or NT FS). For example, my

sudo fdisk -l

looks like this:
Disk /dev/hda: 160.0 GB, 160041885696 bytes
255 heads, 63 sectors/track, 19457 cylinders
Units = cylinders of 16065 * 512 = 8225280 bytes

Device Boot Start End Blocks Id System
/dev/hda1 * 1 1911 15350076 7 HPFS/NTFS
/dev/hda2 1912 19457 140938245 5 Extended
/dev/hda5 1912 14716 102856131 83 Linux
/dev/hda6 14717 17278 20579233+ 83 Linux
/dev/hda7 17279 17404 1012063+ 82 Linux swap / Solaris
/dev/hda8 17405 19457 16490691 83 Linux

From this, I can see that my Windows partition is type NTFS and is located at /dev/hda1.

3. Create a mount point
=====================
The next thing I need to do is create a mount point. This mount point may already exist
as /media/hda1, but I like creating a separate directory altogether:
sudo mkdir /windows


4. Edit the /etc/fstab file
=========================
Now, we need to edit the /etc/fstab file to make the Windows partition mount with the
Mounting Windows Partitions in Ubuntu http://www.psychocats.net/ubuntu/mountwindows
1 of 3 9/25/2008 5:33 PM
Explorer
Mount Linux
Use PartImage
Playing Around
Enable Desktop
Effects
KDE/Gnome
Comparison
Install Gnome
Install KDE
Install XFCE
Install IceWM
Install XPDE
Pure Gnome
Pure KDE
Pure XFCE
A faster KDE
Replacing Nautilus
Troubleshooting
No graphical login
Can't sudo
Graphical sudo


Forgot password
=================

* Off-site link
proper permissions (NTFS is read-only in Ubuntu). First, let's make a back-up copy of
the /etc/fstab file:
sudo cp /etc/fstab /etc/fstab_backup
.
Next, let's edit the fstab file:
sudo nano /etc/fstab
This is what it might look like before we change it:
proc /proc proc defaults 0 0
/dev/hda6 / ext3 defaults,errors=remount-ro 0 1
/dev/hda5 /home ext3 defaults 0 2
/dev/hda1 /media/hda1 ntfs defaults 0 0
/dev/hda7 none swap sw 0 0
/dev/hdc /media/cdrom0 udf,iso9660 user,noauto 0 0
/dev/hdd /media/cdrom1 udf,iso9660 user,noauto 0 0
Note: Starting with Edgy Eft (Ubuntu 6.10), the appearance of the /etc/fstab file has
changed a bit, but the principle still remains. Instead of looking like this:
/dev/hda1 /media/hda1 ntfs defaults 0 0
it may look more like this:
# /dev/hda1
UUID=FC98E2C598E27E10 /windows ntfs defaults,nls=utf8,umask=007,gid=This is what it should look like after we change it:
proc /proc proc defaults 0 0
/dev/hda6 / ext3 defaults,errors=remount-ro 0 1
/dev/hda5 /home ext3 defaults 0 2
/dev/hda1 /windows ntfs nls=utf8,umask=0222 0 0
/dev/hda7 none swap sw 0 0
/dev/hdc /media/cdrom0 udf,iso9660 user,noauto 0 0
/dev/hdd /media/cdrom1 udf,iso9660 user,noauto 0 0


5. FAT32 (instead of NTFS)
===============================
If we also had a FAT32 partition, say at /dev/hdb1, we would unmount it and create a
new mount directory for it:
sudo umount /dev/hdb1
sudo mkdir /fat_files
Then we would add in a line so that our final /etc/fstab would look like this:
Mounting Windows Partitions in Ubuntu http://www.psychocats.net/ubuntu/mountwindows
2 of 3 9/25/2008 5:33 PM
proc /proc proc defaults 0 0
/dev/hda6 / ext3 defaults,errors=remount-ro 0 1
/dev/hda5 /home ext3 defaults 0 2
/dev/hda1 /windows ntfs nls=utf8,umask=0222 0 0
/dev/hdb1 /fat_files vfat iocharset=utf8,umask=000 0 0
/dev/hda7 none swap sw 0 0
/dev/hdc /media/cdrom0 udf,iso9660 user,noauto 0 0
/dev/hdd /media/cdrom1 udf,iso9660 user,noauto 0 0


6. Save changes
================
When you're done editing the /etc/fstab file, save (Control-X), confirm (y), and exit
(Enter).
Finally, we'd remount them both:
sudo mount -a
If, for some reason, that doesn't work, try rebooting the computer.

7. Enable read/write for NTFS
=============================
If you're using Ubuntu 7.04 (or newer) and want to enable read/write permissions (not
just read-only, as the instructions above will give you) for an NTFS partition, follow
these directions
Windows NTFS Partitions Read/write support made easy in Ubuntu Feisty
If you're using Ubuntu 6.10 (or older) and want to enabled read/write permissions for
NTFS, follow these instructions:
HOWTO: NTFS with read/write support using ntfs-3g (easy method)


Reference :
http://www.psychocats.net

Sunday 19 October 2008

Synaptic Package Manager in UBUNTU

Synaptic Package Manager
=========================
Synaptic is an advanced package management application that can install and remove
every package available to your system. The interface is graphical like Add/Remove
Applications but a lot more information is presented to the user, which means that Synaptic
gives you complete control over the package management of your system.

Running Synaptic requires administrative privileges “Root And
Sudo” .

To launch Synaptic, choose System ---> Administration ---> Synaptic Package Manager on
the desktop menu system.


The Synaptic screen is divided up into four sections, the two most important being the
package categories on the left side, and the packages on the right.
To install packages, just choose the category, find the package name in the list, right click
on it and choose "Mark this package for installation". Once you are satisfied with your
selections click Apply on the top button bar. Synaptic will then download and install the
required packages from the online repositories and/or from your Ubuntu installation CD.
Alternatively you can click the Search tool bar button, enter the package name or a short
search term in the search text field and click the Search button.
Synaptic will now show you a much shorter list from which to select your application for
installation. This is usually much easier than having to look through the very long list of
applications on your own.

Thursday 16 October 2008

Oracle Database 10g Express Edition (Tabel --> part 1)


Selah keliling Kampung ama Paman Google....
Akhirnya dapat juga yang ORACLE 10g XE yang GRATIS...
biasa ini untuk paket belajar 'n pelajar

setelah install selesai
coba2x buat tabel-tabel

1. http://127.0.0.1:8080/apex/f?p=4550:11:886705051328341::NO:::
ato
Oracle Database 10g Express Edition -->Go To Database Home Page

2. Login
Username :
Password :

3. Click Object Browser --> Create Table


ternyata setelah pakai PC dengan RAM 256 MB masih terasa berat juga Pakai ORACLE
mungkin krn biasa pakai yang ringat DataBase
by the way... ini sudah sangat cocok untuk seukuran saya...

Tuesday 14 October 2008

JAVA CLOCK

Main2x buat Program JAVA CLOCK .....
--------------------------------------

import java.util.*;
public class CLockTAlk
{
public static void main(String[]args)
{
// get current time and date
Calendar now = Calendar.getInstance();
int hour = now.get(Calendar.HOUR_OF_DAY);
int minute = now.get(Calendar.MINUTE);
int month = now.get(Calendar.MONTH)+ 1;
int day = now.get(Calendar.DAY_OF_MONTH);
int year = now.get(Calendar.YEAR);

// display gretting
if (hour < 12)
System.out.println("Good morning Sir!
Have you ate breakfast
yet?");
else if (hour < 18)
System.out.println("Good afternoon Sir!
Have you ate lunch
yet?");
else
System.out.println("Good evening Sir!
Have you ate dinner
yet?");

// begin time message by showing the minutes
System.out.print("It is");
if (minute != 0)
{
System.out.print(" " + minute + " ");
System.out.print( (minute != 1) ? "minutes" : "minute");
System.out.print(" past");
}

// display the hour
System.out.print(" ");
System.out.print( (hour > 12) ? (hour - 12) : hour );
System.out.print(" 0'clock on ");

// display the name of the month
switch (month)
{
case 1:
System.out.print("January");
break;
case 2:
System.out.print("February");
break;
case 3:
System.out.print("March");
break;
case 4:
System.out.print("April");
break;
case 5:
System.out.print("May");
break;
case 6:
System.out.print("June");
break;
case 7:
System.out.print("July");
break;
case 8:
System.out.print("August");
break;
case 9:
System.out.print("September");
break;
case 10:
System.out.print("October");
break;
case 11:
System.out.print("November");
break;
case 12:
System.out.print("December");
}

// display the date and year
System.out.println(" " + day + ", " + year + ".");
}

}


Reference
http://www.sourcecodesworld.com

Solaris Admininstror’s Command

Solaris Admininstror’s
Quick Reference

User Initialization
==============
/etc/profile ($HOME/.profile)
sh, bash, ksh system wide (per user) init
(system wide init has no effect in CDE environment).
/etc/.login ($HOME/.login)
csh, tcsh system wide (per user) init
(system wide init has no effect in CDE environment).
$HOME/.cshrc
per user csh, tcsh init (order: /etc/.login ? $HOME/.cshrc ?
$HOME/.login).
/usr/dt/config/Xsession.d/2000.login
system wide init for CDE environment (a script in Xsession.d).
$HOME/.dtprofile
per user init for CDE environment.
/etc/skel/*
Templete files (local.cshrc, local.login, local.profile) copied to
new user’s home directory.


Network Configuration
================
/etc/defaultdomain
NIS/NIS+ domain name.
/etc/defaultrouter
IP address of the default router.
/etc/resolv.conf
Internet domain name, name server and search order.
An example of resolv.conf
domain la.asu.edu
nameserver 129.219.17.200
nameserver 129.219.17.5
search la.asu.edu asu.edu
/etc/nsswitch.conf
specifying information source from files, NIS, NIS+, or DNS.
/etc/hostname.{hme0|le0}
Ipv4 hostname.
/etc/nodename
IPv6 hostname.
/etc/inet/hosts
Host name file (/etc/hosts is a link to this file).
/etc/inet/netmasks
TCP/IP subnet masks.
/etc/inet/protocols
Network protocols.
/etc/inet/services
Network service name and port number.
/etc/notrouter
create this file prevent in.routed or in.rdiscd from starting at
boot time.
/etc/inet/inetd.conf
Internet super daemon configuration file.

Change hostname/IP address
====================
/etc/hostname.{hme0|le0}
/etc/nodename;
/etc/inet/hosts;
/etc/net/*/hosts;
/etc/defautrouter;
/etc/resolv.conf

Setup Printer
Local printer
===========
lpadmin –p prt_name –v /dev/ecpp0 -D “description” –T PS
-I postscript
parallel port: {/dev/ecpp0 | /dev/bpp0}
serial port: {/dev/term/a | /dev/term/b}

Printer connected to a computer
========================
lpadmin –p prt_name –s host_name –T unknow –I any

Network capable printer
=========================
lpadmin –p prt_name –m netstandard –v /dev/null
-D “description” -o protocol={bsd | tcp}
-o dest=prtIP:9100 ? port needed for tcp protocol
-o banner={never | optional | always}
-o timeout=300


Misc printing commands
lpadmin –d prt_name
===================
set prt_name as the default printer.
lpstat –d
show current default printer.
lpstat –p prt_name –l
show prt_name configuration.
lpstat –t
show all printer status.

Environment variables
LPDEST or PRINTER
===================
User default printer.
_default in /etc/printers.conf
system default printer.

Disable banner
====================
edit file /etc/lp/interfaces/prt_name
nobanner=yes

Common setting stored in file
=====================
/etc/lp/printers/prt_name/configuration
/usr/lib/lp/model

File Sharing
====================
/etc/vfstab
File mount table (local or NFS).
/etc/dfs/dfstab
File sharing table (NFS server).
/etc/auto_master
Automounter master map, sample as follow
#### Master map for automounter ####
/home auto_home -nobrowse
/- auto_direct -ro
/etc/auto_home
Automount home (indirect) map, sample as follow
#### mount home directory #####
jialong bluebear:/export/home/jialong
/etc/auto_direct
Automount direct map, sample as follow
#### mount /usr/local from a server ####
/usr/local bluebear:/usr/local
/etc/vold.conf
Volume manager configuration.

share [options] pathname
==========================
export NFS file systems to other computers.

mount [options] filesrv:/pathname /mnt
=============================
Mount remote file system. For security, when possible, mount
system as readonly and nosuid.
/etc/rmmount.conf
Removable disk configuration.
Sendmail Configuration
/etc/mail/sendmail.cf
sendmail configuration file.
/etc/mail/aliases
aliases file. Must run newaliases after modifying aliases file.

Configure a mail server
=========================
Generate new configuration file
cd /usr/lib/mail/cf
cp main -v7sun.mc foo.mc
/usr/ccs/bin/make foo.cf
Test new mail configuration file
/usr/lib/sendmail –C foo.cf –v email_address Install configuration file
cd /etc/mail
cp sendmail.cf sendmail.sav
cp /usr/lib/foo.cf sendmail.cf
pkill –HUP sendmail

Anti -spam
===========================
make sure FEATURE(access_db) is in sendmail.mc
create /etc/mail/access with something like
cyberpromo.com REJECT
sendmail.org RELAY
spam@buyme.com 550 Spammers shan't see sunlight here
makemap hash /etc/mail/access < /etc/mail/access
CDE configuration
=============================
$HOME/.dtprofile
per user CDE init file, gemerated from
/{usr|etc}/dt/config/sys.dtprofile.
$HOME/.dt/dtwmrc
desktop manager configuration file (pop-up menu when right
click mouse). From /{usr|etc}/dt/config/C/sys.dtwmrc
/usr/dt/appconfig/types/C/dtwm.fp
copy to $HOME/.dt/types/myname.fp and modify it.

$HOME/.dt/sessionetc
per user CDE session start file (script with execute perm).
$HOME/.dt/sessionexit
per user CDE exit file (script with execute permission).
/{usr | etc}/dt/config/C/Xresources
control attribute of login screen, for example, to disable session
menu, uncomment following line
Dtlogin*session_menus*sensitive: False
/{usr | etc}/dt/config/C/sys.resources
session resource, for example, to disable automatic screen lock,
set timout to 0
dtsession*lockTimeout: 0
$HOME/.dt/sessions/{current | home}
current (home) session files.
/{usr | etc}/dt/config/Xconfig
configuration file for login screen (dtconfig), after change use
dtconfig –reset
/usr/dt/config/Xstartup
this script run after user login but before user session.
/usr/dt/config/Xaccess
Control access to Xserver.
/usr/dt/bin/Xsession
start CDE session
/usr/dt/config/Xsession.d/*
Scripts auto executed by Xsession.
usr/dt/config/Xsession.ow
start OpenWindow session.
/usr/dt/config/Xreset
Command executed after the session end.
/usr/dt/bin/dtconfig –e|-d|-kill
-e|-d: enable (disable) autostart login server.
-kill: kill dtlogin and all its child process.
$HOME/.dt/icons
$/{usr|etc}/dt/appconfig/icons/C
default icons search path.

System Configuration
=========================
/etc/passwd, /etc/shadow, /etc/group
user account information.
/etc/ftpusers
users NOT allowed to use FTP.
/etc/system
Kernel parameters
Example: disable execution in stack
set noexec_user_stack=1
set noexec_user_stack_log=1
set maxuprc = 128 # maximum no. of user process
set sys:coredumpsize = 0 # prevent core dump
/etc/hosts.equiv, ($HOME/.rhosts)
system wide (per user) trust hosts.
/etc/motd, (/etc/issue)
message after (before) login.
/etc/shells
allowed shell program.
/etc/initab
run level configuration.
/etc/rc{S, | 1 | 2 | 3 | 5 | 6}.d
scripts for different run levels.
/etc/bootparams
rpc.bootparamd configuration file.
/etc/pam.conf
pluggable authentication configuration file.
/etc/power.conf
power configuration.
/etc/printers.conf
BSD printer configuration.
/etc/magic
used by “file” command to determine file type.
/etc/security/*
security audit related files.
/etc/syslog.conf
system log daemon configuration file.
/etc/notrouter
specify this host is not a router.
Default info for various program
/etc/default/power
power management parameters.
/etc/default/Solregis
put DISABLE=1 to disable solaris registration screen.
/etc/default/su
settings for “su” command.
/etc/default/sys-suspend
users permitted to put system in suspend mode.
/etc/default/passwd
minimum password length.
/etc/default/login
login related settings, put CONSOLE=/dev/console
disable root login by telnet (rlogin).
/etc/default/init
time zone, CMASK (default 022)
/etc/default/kbd
KEYBOARD_ABORT=disable
Application Configuration
/etc/ssh2/ssh2_configure ($HOME/.ssh2/ssh2_config)
SSH client system wide (per user) configuration file.
/etc/ssh2/sshd2_config ($HOME/.ssh2/sshd2_config)
SSH server system wide (per user) configuration file.

Setup SSH2 to accept hostbased authtication
=======================================
(1) Server side
In sshd2_config, includes hostbased, like this
AllowedAuthentications hostbased, publickey, password
In /etc/hosts, use client’s full qualified domain name (FQDN).
In .rhosts (.shosts), also use FQDN, make user these files are
owned by that user and not writeble by other users.
Copy client’s hostkey.pub to server’s /etc/ssh2/knownhosts and
name it as FQDN.ssh -dss.pub (e.g., bluebear.la.asu.edu.sshdss.
pub).
(2) Client side
In ssh2_config, includes hostbased authentication, like this
AllowedAuthentications hostbased, publickey, password
Also need to set DefaultDomain keyword, like
DefaultDomain la.asu.edu
/usr/local/lib/pine.conf
system wide PINE configuration, overwrite by $HOME/.pinerc
/usr/local/lib/pine.conf.fixed
system wide PINE configuration, NOT overwrite by ~/.pinerc
httpd.conf (https.conf)
Apache web server configuration file. (www.apache.org)
smb.conf
Samba (window server) configuration file. (www.samba.org)


Miscellaneous Commands
SUN patch files and freeware
=============================
http://sunsolve.sun.com
http://sunfreeware.com
Forget root password
boot –s cdrom
find out root partition with “format” command
mount /dev/dsk/c0t0d0s0 /mnt (suppose c0t0d0s0 is root part.)
edit /mnt/etc/shadow

Disable auto-logout feature for tcsh
===============================
Put following line in .cshrc or .tcshrc
unset autologout
edit /etc/inittab
remove sc:234:respawn:/usr/lib/saf/sac –t 300
disable serial device (modem) login.
showmount –e host_name
show export file systems on host_name.
rpcinfo –p host_name
check RPC services on host_name.
ldd program
show what dynamic libraries needed by program.
LD_LIBRARY_PATH is the search path for dynamic libraries.
useradd –d homedir –u UID –g GID –c “comment” –s shell
add new user account.
man foo | col –b > foo.txt
save manual page for command “foo” in pure text.
pkgadd –d pkgfile
add solaris package file.
boot –r
Reconfiguration system after adding new hardware.
who –r
show current run level.
volcheck –v
check if new floppy/cdrom is inserted.
fuser –u [-k] /cdrom
Show which program is using the cdrom (or floppy).
/usr/sbin/eeprom
show settings in eeprom.
/usr/sbin/prtconf –vb
show system information.
find / -type f –perm -4000 –user root –print
find set UID to root program.
m64config –res 1024x768x75 –depth 24
set screen resolution, color depth for M64 frame buffer.
(ffbconfig on Ultra -60)
fsck –F ufs –y /dev/rdsk/c0t0d0s0
file system check, answer “y” to all questions.
xv –root –quit foo.gif
set CDE screen background.
/etc/init.d/script {start | stop}
run a script in /etc/init.d directory.
newfs –v /dev/rdsk/c0t0d0s6
construct new file system after format.
/usr/sbin/sys-unconfi g
reconfiguring the system.

patchadd [options] patch
apply patch to system.

ufsdump 0uf /dev/rmt/0 /
backup of all files.

ufsrestore xf /dev/rmt/0 etc/inetd.conf
restore inetd.conf file from backup

install_cluster –q -nosave
install recommended patch cluster.

ndd
set TCP/IP parameters

eeprom
change settings in eeprom, like
eeprom security-mode=full

Shell Programming
i f-then-else
========================
sh, bash, ksh
if condition; then
action_1; else
action_2; fi
csh, tcsh
if (condition) then
action_1;
else
action_2;
endif
foreach
sh, bash, ksh
for key in list… ; do
actions; done
csh, tcsh
foreach key (list)
actions
end
Rename files
foreach i (*)
mv $i $i.old
end
do-while
sh, bash, ksh
while condition; do
actions; done
csh, tcsh
while (condition)
actions
end


Reference
Author: Jialong He
Email: Jialong_he@bigfoot.com
http://www.bigfoot.com/~jialong_he
Ubuntu Reference Command

Ubuntu Reference
------------------------------------

Privileges
===================================
sudo command – run command as root
sudo -s – open a root shell
sudo -s -u user – open a shell as user
sudo -k – forget sudo passwords
gksudo command – visual sudo dialog (GNOME)
kdesudo command – visual sudo dialog (KDE)
sudo visudo – edit /etc/sudoers
gksudo nautilus – root file manager (GNOME)
kdesudo konqueror – root file manager (KDE)
passwd – change your password

Display
=======================================
sudo /etc/init.d/gdm restart – restart X and
return to login (GNOME)
sudo /etc/init.d/kdm restart – restart X and
return to login (KDE)
(file) /etc/X11/xorg.conf – display

configuration
========================================
sudo dexconf – reset xorg.conf configuration
Ctrl+Alt+Bksp – restart X display if frozen
Ctrl+Alt+FN – switch to tty N
Ctrl+Alt+F7 – switch back to X display

System Services¹
========================================
start service – start job service (Upstart)
stop service – stop job service (Upstart)
status service – check if service is running
(Upstart)
/etc/init.d/service start – start service
(SysV)
/etc/init.d/service stop – stop service (SysV)
/etc/init.d/service status – check service
(SysV)
/etc/init.d/service restart – restart service
(SysV)
runlevel – get current runlevel

Package Management¹
===========================================
apt-get update – refresh available updates
apt-get upgrade – upgrade all packages
apt-get dist-upgrade – upgrade with package
replacements; upgrade Ubuntu version
apt-get install pkg – install pkg
apt-get purge pkg – uninstall pkg
apt-get autoremove – remove obsolete packages
apt-get -f install – try to fix broken packages
dpkg --configure -a – try to fix broken
packages
dpkg -i pkg.deb – install file pkg.deb
(file) /etc/apt/sources.list – APT repository
list

Network
======================================
ifconfig – show network information
iwconfig – show wireless information
sudo iwlist scan – scan for wireless networks
sudo /etc/init.d/networking restart – reset
network for manual configurations
(file) /etc/network/interfaces – manual

configuration
=======================================
ifup interface – bring interface online
ifdown interface – disable interface
Special Packages
ubuntu-desktop – standard Ubuntu environment
kubuntu-desktop – KDE desktop
xubuntu-desktop – XFCE desktop
ubuntu-minimal – core Ubuntu utilities
ubuntu-standard – standard Ubuntu utilities
ubuntu-restricted-extras – non-free, but useful
kubuntu-restricted-extras – KDE of the above
xubuntu-restricted-extras – XFCE of the above
build-essential – packages used to compile

programs
==========================================
linux-image-generic – latest generic kernel
image
linux-headers-generic – latest build headers

Firewall¹
============================================
ufw enable – turn on the firewall
ufw disable – turn off the firewall
ufw default allow – allow all connections by
default
ufw default deny – drop all connections by
default
ufw status – current status and rules
ufw allow port – allow traffic on port
ufw deny port – block port
ufw deny from ip – block ip adress

Application Names
===========================================
nautilus – file manager (GNOME)
dolphin – file manager (KDE)
konqueror – web browser (KDE)
kate – text editor (KDE)
gedit – text editor (GNOME)

System
===========================================
Recovery - Type the phrase “REISUB” while
holding down Alt and SysRq (PrintScrn) with
about 1 second between each letter. Your system
will reboot.
lsb_release -a – get Ubuntu version
uname -r – get kernel version
uname -a – get all kernel information


Reference
-----------------------------------------
Prefix commands with sudo to run.
Ubuntu is a trademark of Canonical Ltd. Licensed under CC-BY-SA 3.0. Free to redistribute; see creativecommons.org for details.

Friday 10 October 2008

Game Tom & Jerry HandPhone Play in PC

OOT :-) karena ada permintaan nih di OS WIN
1. Install Dulu Java ME and Java Wireless Toolkit
http://java.sun.com

2. mengubah JAR ke JAD (MIDP),
Pakai JAD Converter


3. Click Tom&Jerry yang ext MIDP


slamat bersenang-sengan ya....


Game2x HandPhone http://gallery.mobile9.com

Thursday 9 October 2008

The Solaris (Unix) Directories in Synchro


The Cadence Debugger is an incremental editor, line-by-line compiler and incremen-
tal source code debugger. Statements are compiled as they are entered, providing
real-time syntax checking with helpful error messages. The Debugger allows execu-
tion instantaneously following code changes. Immediate-mode execution of Cadence
statements and procedures speeds program development by allowing experimenta-
tion, without requiring actual modification of the program. A test program can be
stopped at a breakpoint, modified, then resumed. Test programs with compile errors
are allowed to execute until an error is encountered. The error can then be stepped
over and execution continued. Sections of the test program may be executed in any
order. The execution pointer, showing which line is about to be executed, can be moved
so that sections of code can be repeated or skipped.

A debugger can also be started from shell prompt
Ex : basyn10 > Led “Test_Program_name”

Tuesday 7 October 2008

Tools Command Debugging FLEX Tester (no#2)

1. TheHdw.Alarms.Alarmcheck
This command checks, reports and clears all latched alarms. It does not change the state
(open/close) of the alarm window. By default, alarms are checked only during measurement or
at the limit check. This command can be applied during any point in a test program execution.
This command is read only. And return type is Boolean.
2. TheHdw.Alarms.DumpStates
This command checks and reports the alarms and/or shutdown found in the system to the
output window. This command does not clear alarms. This command is useful for monitoring
alarms during debug work.
This command is read only. And return type is text into the output window.
3. TheHdw.Alarms.EnableAll
This command returns all tester instrumentation alarm setting/behavior to their default values.
4. TheHdw.WindowNesting
This command returns the alarm window nesting level. If the return value is greater than zero,
the alarm window is open; any alarms that occur will be latched and reported at the next alarm
check. If the value is zero, the alarm window is closed. Any alarms that have been latched
when this nesting level is zero will be cleared prior to the alarm window opening.
This command is read only. And return type is integer.
Teradyne Users Group – 2006 – Marriott Sawgrass, Ponte Vedra, FL 21
5. TheHdw.Digital.Patterns.Pat.StartStop(StartLabel, StopLabel,
DisableAlarmcheck)
This command has two features. The first one inserts a pattern halt at StopLabel specified.
(Any previous StopLabel is removed.) The pattern halt at StopLabel is inserted by modifying
the pattern in tester memory. The second one controls the alarm window. When
DisableAlarmcheck is set to True, the pattern is started without opening alarm window.
Differences between Run, Start and StartStop
a. TheHdw.Digital.Patterns.Pat.Run (StartLabel)
Alarm window is opened at pattern start and closed at the pattern is stopped. Alarms will be
reported right after the pattern is stopped. The VBT section of the program will be stopped
waiting for the pattern to complete.
Figure 9 –Alarm Window Open Close with .Run
b. TheHdw.Digital.Patterns.Pat.Start (StartLabel)
Alarm window is opened at pattern start. And the alarm window is closed at .HaltWait or
.Halt command and alarms will be reported. The alarm window is not close by the halt
microcode in the pattern.
Figure 10 –Alarm Window Open Close with .Start
c. TheHdw.Digital.Patterns.Pat.StartStop(StartLabel,
StopLabel,DisableAlarmcheck=true)
When the DisableAlarmcheck is set to True, alarm window will not be opened at pattern
start. If alarms were latched before, durning and after the pattern start in some
instruments, the latched alarms will be report at .HaltWait or .Halt command.
Figure 11 –Alarm Window Open Close with .StartStop
Teradyne Users Group – 2006 – Marriott Sawgrass, Ponte Vedra, FL 22
6. Trap on Alarm
This feature allows the test program to stop execution at point where a latched hardware alarm
is detected.
The Trap on Alarm feature is enabled from the Setup Tab in Run Options.

Sunday 5 October 2008

LTX Tester CANDENA PVI ALARM IN TEST NO 660 (S_IX_IV_VI_S)-->1

Reduce ALARM in PVI
==========================================
begin pvi sequence SEQ_VCLAMP
if wafer_test then
gate pvi chan gnd_pvi on with timeout of 100ms
end_if
set pvi sequencer wait 100us
gate pvi chan out_pvi on with timeout of 10ms
set pvi sequencer wait t_meas
measure pvi v on chan out_pvi average 5 into local 2 delayed by 30us
set pvi sequencer wait (t_pulse-t_meas)
gate pvi chan out_pvi off
set pvi sequencer wait 30ms -- cool down device 10ms orginale
----
-----
------

Saturday 4 October 2008

HS Teradyne Tester

====================livevoltage===============================================

Function OnProgramStarted()

thehdw.DCVI.HotSwitchDetect.LiveVoltageHotSwitch.Enable = True
thehdw.DCVI.HotSwitchDetect.LiveVoltageHotSwitch.mode = tlDCVIHotSwitchDetectModeLogging


Function OnProgramEnded()


thehdw.DCVI.HotSwitchDetect.LiveVoltageHotSwitch.Enable=False

Exit Function

===========================settlewaitime============================================

Function OnProgramStarted()

thehdw.DCVI.HotSwitchDetect.SettleWaitHotSwitch.Enable = True
thehdw.DCVI.HotSwitchDetect.SettleWaitHotSwitch.mode = tlDCVIHotSwitchDetectModeLogging


Function OnProgramEnded()

thehdw.DCVI.HotSwitchDetect.SettleWaitHotSwitch.Enable = False

Exit Function

The Linux Hierarchy of Directories


====================================================================================

/bin—Contains common Linux user commands, such as ls, sort, date, and chmod.

/boot—Has the bootable Linux kernel and boot loader configuration files (GRUB).

/dev—Contains files representing access points to devices on your systems. These
include terminal devices (tty*), floppy disks (fd*), hard disks (hd*), RAM (ram*), and
CD-ROM (cd*). (Users normally access these devices directly through the device files.)

/etc—Contains administrative configuration files.

/home—Contains directories assigned to each user with a login account.

/media—Provides a standard location for mounting and automounting devices, such
as remote file systems and removable media (with directory names of cdrecorder,
floppy, and so on).

/mnt—A common mount point for many devices before it was supplanted by the standard

/media directory. Some bootable Linux systems still used this directory to mount
hard disk partitions and remote file systems.

/proc—Contains information about system resources.

/root—Represents the root user’s home directory.

/sbin—Contains administrative commands and daemon processes.

/sys (A /proc-like file system, new in the Linux 2.6 kernel and intended to contain
files for getting hardware status and reflecting the system’s device tree as it is seen by the
kernel. It pulls many of its functions from /proc.

/tmp—Contains temporary files used by applications.

/usr—Contains user documentation, games, graphical files (X11), libraries (lib), and a
variety of other user and administrative commands and files.

/var—Contains directories of data used by various applications. In particular, this is
where you would place files that you share as an FTP server (/var/ftp) or a Web server
(/var/www). It also contains all system log files (/var/log) and spool files in
/var/spool (such as mail, cups, and news).


Reference : Linux Bible 2007

Thursday 2 October 2008

Java ME --> Mobile Information Device Profile (MIDP)

HelloMidp Revisited
=============================================

import javax.microedition.midlet.*;
import javax.microedition.lcdui.*;

Like all MIDP applications, the HelloMidp example is required to extend the MIDlet class:

public class HelloMidp extends MIDlet {

In the constructor, you obtain the Display and create a Form:

Display display;
Form mainForm;

public HelloMidp () {
mainForm = new Form ("HelloMidp");
}

A Form is a specialized Displayable class. The Form has a title that is given in the constructor. You do not add content to the form yet, so only the title will be displayed. (A detailed description of the Form class is contained in the next section.)

When your MIDlet is started the first time, or when the MIDlet resumes from a paused state, the startApp() method is called by the program manager. Here, you set the display to your form, thus requesting the form to be displayed:

public void startApp() {
display = Displayable.getDisplay (this);
display.setCurrent (mainForm);
}

When the application is paused, you do nothing because you do not have any allocated resources to free. However, you need to provide an empty implementation because implementation of pauseApp() is mandatory:

public void pauseApp() {
}

Like pauseApp(), implementation of destroyApp() is mandatory. Again, you don't need to do anything here for this simple application:

public void destroyApp(boolean unconditional) {
}
}


Reference : http://www.developer.com

Wednesday 1 October 2008

Script Menu di Linux

$vi menu


#
# Script to create simple menus and take action according to that selected
# Menu Item
#
while :
do
clear
echo "--------------------------------------------"
echo " Main Menu ---> Created by David W"
echo "--------------------------------------------"
echo "[1] Show Today date / Time"
echo "[2] Show Files in Current directory"
echo "[3] Show Calendar"
echo "[4] Start Editor to Write Letters"
echo "[5] Exit/Stop"
echo "============================================"
echo -n "Enter your menu choice [1-5]:"
read yourch
case $yourch in
1) echo "Today is `date` , press a key...";read ;;
2) echo "Files in `pwd`";ls -l ; echo "Press a key...";read ;;
3) cal ; echo "Press a key...";read ;;
4) vi ;;
5) exit 0 ;;
*) echo "Opps!!! Please Select Choice 1,2,3,4, or 5";
echo "Press a key...";read;;
esac
done


save wq!

running
$./menu

Reference ; Linux Shell programming